

Ever wondered how electricity transforms metal into unbreakable bonds? This method of arc welding harnesses intense heat to fuse materials, creating connections stronger than the original pieces. Whether you’re a welder crafting furniture or repairing machinery, proper groundwork separates shaky results from flawless weld seams.
Think of setup like sharpening a knife – skip this step, and you’ll struggle through the entire job. Clean surfaces matter more than you’d guess. Even tiny bits of rust or paint can weaken joints over time. Why risk cracks when a wire brush and grinder ensure perfection in your welding?
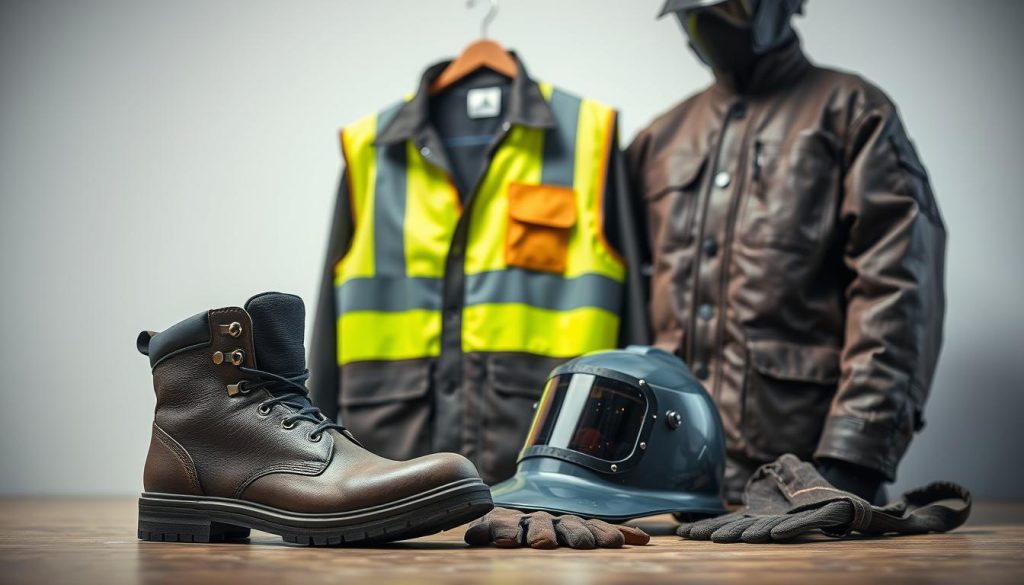
Safety isn’t optional. A single spark can cause big trouble without the right gear. Thick gloves, flame-resistant clothing, and a quality helmet protect you from burns and eye strain while working with various materials. Remember: No shortcuts here. Your equipment matters too. Check cables for frays and confirm your tools match the base metal’s thickness. Always ensure your electrode and gas settings are appropriate for the material you’re welding.
Key Takeaways
- Clean surfaces thoroughly to prevent weak spots in your welds
- Always wear protective gear like gloves and helmets while welding
- Match equipment settings to your project’s needs and the type of material
- Inspect tools for damage before starting any welding job
- Practice steady hand movements for even welds with your filler metal
Ready to dive deeper? What separates pros from amateurs isn’t just skill – it’s how they prepare for arc welding. Stick around to learn how small details create industrial-grade results, even on your first try.
Introduction to Arc Welding and Its Importance
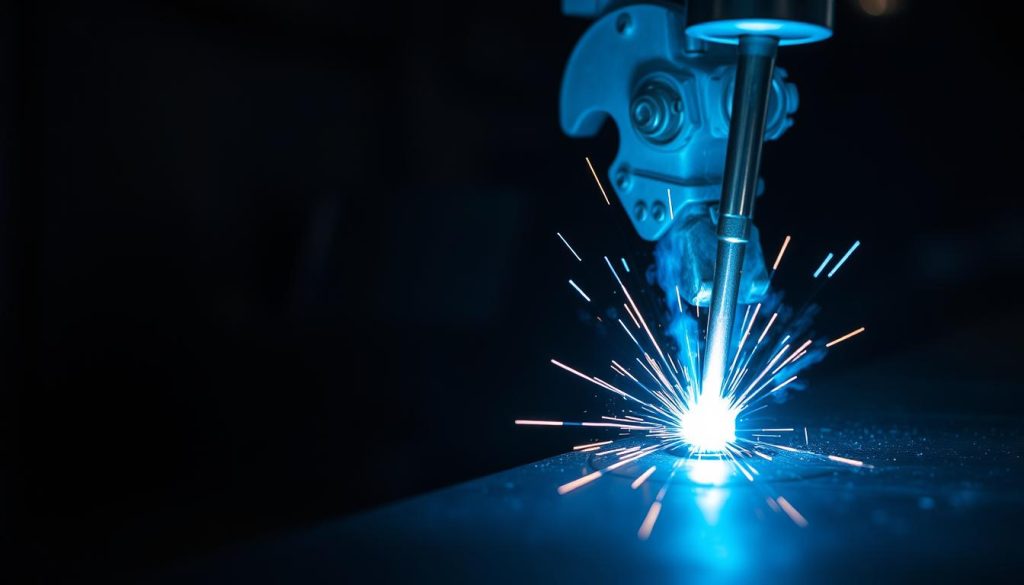
What holds together the world around us? From towering bridges to everyday appliances, arc welding quietly shapes modern life. This method uses electricity to generate temperatures exceeding 6,500°F – hotter than lava – melting metals into permanent bonds stronger than the original materials.
Nearly every industry relies on this arc welding process. Construction crews fuse steel beams for skyscrapers using various types of arc welding techniques. Mechanics repair aluminum truck frames with specialized filler metal. Even spacecraft components depend on specialized arc techniques. Why does this matter? Without these invisible seams, entire structures could collapse under stress.
The magic happens when electricity jumps between an electrode and your workpiece. This arc acts like a microscopic lightning bolt, creating instant liquid metal on the surface. As it cools, you get welds that withstand extreme pressures and weather. Different materials need specific approaches – stainless steel behaves differently than copper pipes, for example, and requires the right filler wire for optimal joint strength.
| Industry | Common Use | Typical Metals |
| Automotive | Frame assembly | Steel, aluminum |
| Aerospace | Engine parts | Titanium alloys |
| Construction | Structural beams | Carbon steel |
| Marine | Ship hulls | Stainless steel |
Cost efficiency makes arc welding methods popular. Unlike expensive alternatives, basic setups work for small repairs or massive projects. Proper technique ensures decades of reliable service – that backyard gate will swing smoothly long after installation.
Ever driven over a bridge? Flown in a plane? Arc welding helped build both. Its versatility explains why professional welders prioritize mastering this welding skill. When lives depend on structural integrity, there’s no room for weak joints.
Fundamentals of the Arc Welding Process
What makes sparks fly in perfect formation during metal joining? The answer lies in controlled chaos. This section breaks down how electricity becomes your shaping tool and why technique choice determines your project’s success.
Principles of Arc Generation
Think of your welding setup as a conversation between three partners: the power source, electrode, and workpiece. When they connect properly, electricity leaps across the gap like a tiny lightning bolt. Initial voltages of 60-80 volts create the spark, then settle to safer 10-5 volts during operation.
That bright flash isn’t just light – it’s heat reaching 6,000°F. This energy melts metals faster than a blowtorch, forming a liquid pool that fuses materials together in a strong weld. The secret? Maintaining consistent distance between the electrode and workpiece surface. Too close, and you’ll stick. Too far, and the arc breaks.
Overview of Welding Techniques
Different jobs demand different welding approaches. Shielded metal arc (SMAW) uses coated rods perfect for outdoor repairs – no gas needed. Gas metal arc (GMAW) feeds wire continuously, ideal for quick production runs. For delicate work, gas tungsten arc (GTAW) offers surgical precision with non-melting electrodes.
Ever tried welding aluminum bicycle frames? Mastering metal joining techniques helps match methods to materials and types. Flux-cored welding handles dirty surfaces better than most, while submerged arc works wonders on thick steel plates.
Each welding process has its rhythm. Some need steady hands, others require speed. Practice helps you feel when to push or pause, creating welds that hold under pressure. What will your next project demand from your welding equipment?
Key Safety Considerations for Arc Welding
Would you handle molten lava without protection? That’s essentially what happens when working with 6,500°F sparks. Every welding project demands respect for the invisible dangers swirling around your workspace.
A crucial part of preparation is ensuring proper ventilation and safety measures for arc welding, which helps protect you from harmful fumes and reduces the risk of accidents during the welding process.
Your Body’s Force Field
That buzzing sound isn’t just electricity – it’s a reminder to suit up properly for arc welding. A quality helmet stops UV rays that can burn retinas faster than staring at the sun. Pair it with leather gloves thicker than your winter boots, and jackets that won’t melt if sparks land on your sleeve during the welding process. Proper protective equipment is essential for safety when working with various types of materials, especially for a welder handling different surfaces.
Ever smelled burnt hair? Synthetic fabrics melt onto skin. Cotton or wool blends resist ignition, while steel-toe boots prevent crushed toes from falling metal. Respiratory masks filter out fumes that could linger in your lungs for decades, ensuring safety in your work area while performing arc welding tasks and creating strong welds.
Controlling the Danger Zone
Your work area needs as much prep as your tools. Clear every paper scrap and grease spot within 35 feet – sparks travel farther than you’d think in the welding process. Ground your machine properly, especially outdoors where damp grass increases shock risks. Maintaining a clean surface is crucial for effective welding and achieving the best results with your electrode.
Ventilation matters more than comfort. Open doors help, but industrial fans or exhaust systems remove toxic gases effectively. Keep fire extinguishers visible, not buried under tools. Remember: Safety isn’t about fear – it’s about staying in control when things get hot during the welding process.
Essential Equipment for Metal Arc Welding
What tools transform sparks into unbreakable bonds? The answer lies in four critical components working together. Each piece plays a distinct role in creating strong, lasting joints in your welding applications, from the type of electrode used to the equipment setup.
A successful welding project starts with gathering necessary tools and equipment for arc welding, ensuring you have everything from protective gear to the right electrodes before beginning the job.
Welding Machine and Power Sources
Your power converter acts as the project’s heartbeat. AC units handle aluminum smoothly, while DC options provide better control for steel. Combination machines offer flexibility but cost more – choose based on your most frequent projects.
Thicker materials demand higher amperage. A ¼-inch steel plate might need 140 amps, while thin sheet metal works at 80. Always check manufacturer charts for precise settings. Ground clamps complete the circuit – loose connections cause erratic sparks and weak joints.
Electrodes, Clamps, and Protective Gear
Rods come coded for specific uses. E6013 works well for beginners on clean steel, while E7018 handles dirty surfaces better. Match diameters to material thickness – 1/8-inch rods suit most general repairs.
Locking pliers keep pieces aligned during work. Auto-darkening helmets protect eyes without constant flipping. Never skip gloves – leather palms resist heat better than synthetic alternatives. Proper gear turns dangerous work into controlled precision, ensuring safety while welding.
Ever tried painting with a broom? Using mismatched tools leads to frustration. Quality equipment makes the difference between amateur results and professional-grade seams that last decades.
Preparation Steps For Arc Welding
Why do some welds last decades while others fail quickly? The answer hides in what happens before the sparks fly in the arc welding process. Proper groundwork turns shaky connections into unbreakable joints. Let’s explore the two pillars of success: pristine surfaces and precise machine settings for effective arc welding.
Creating the Perfect Canvas
Imagine painting over a dusty wall – that’s what welding on dirty metal surfaces feels like. Start with a wire brush to scrub away rust and grime. For stubborn spots, angle grinders strip contaminants down to bright, fresh material. This clean slate lets the electrode bond properly with the base metal.
Thicker pieces need special attention. Beveling edges creates a V-shape groove that allows deeper heat penetration. A 45-degree angle works best for steel over ¼-inch thick. This simple step prevents weak spots in load-bearing structures and enhances the overall joint strength.
Dialing In Your Tools
Your welding machine isn’t a “set and forget” device. Match the electrode type to your project – E6013 rods work great on clean steel, while E7018 handles rougher surfaces. Check the diameter too: 1/8-inch suits most general repairs across various applications.
Preparation Steps For Arc Welding
Amperage acts like your heat thermostat in the welding process. Use this quick guide for different types of metal:
| Material Thickness | Electrode Size | Amperage Range |
|---|---|---|
| 1/8″ steel | 3/32″ | 75-95A |
| 1/4″ aluminum | 1/8″ | 110-130A |
| 3/8″ stainless | 5/32″ | 140-160A |
Double-check connections before striking an arc. Loose clamps cause erratic sparks and uneven heating. Remember: Good prep today means fewer headaches tomorrow. Your future self will thank you when those seams hold firm under pressure during the welding process.
Step-by-Step Arc Welding Technique
Ever watched sparks turn into rock-solid joints? The secret lies in rhythm and precision. Let’s break down the moves that transform flickering light into lasting connections in your welding projects.
Igniting the Spark
Starting strong matters. Hold your electrode rod like a pencil – firm but relaxed. Tap the tip against clean metal or scratch it like lighting a match. When that bright flash appears, lift slightly to maintain a steady 3/8-inch gap. Too close? The electrode sticks. Too far? The connection breaks.
Consistency separates shaky lines from smooth beads. Imagine dragging a paintbrush across hot steel. Keep your angle between 15-30 degrees, moving at walking speed. Circular motions help fill gaps, while zig-zag patterns spread heat evenly across the joint. The type of wire you use can also affect the quality of the weld. Proper setup techniques make this easier by eliminating distractions before you start your welding.
Sustaining the Flow
Listen to the sizzle – it tells you everything about the weld. A steady crackle means good penetration. Popping sounds? Your amperage needs adjusting. Watch the molten pool flow slightly ahead of your rod. This “leading edge” ensures deep fusion without burning through thin materials. The base material’s cleanliness is crucial for a strong bond.
Need help troubleshooting? Expert welding tips recommend practicing on scrap metal first. Adjust your grip, test different angles, and find what feels natural. Like riding a bike, muscle memory kicks in faster than you’d expect. Soon, you’ll create seams that look machine-made – strong enough to handle whatever life throws at them.
FAQ
Why is cleaning the base metal crucial before welding?
Dirt, rust, or grease on the surface can weaken your welds. Proper preparation and cleaning of the base ensure strong fusion and reduce cracks in the weld area. Use a wire brush or grinder to remove contaminants—it’s like giving your project a fresh start!
How do I choose the right electrode type for gas metal arc welding?
Match the electrode type to your material! For steel, ER70S-6 works well. Aluminum? Try ER4043. Flux-cored arc welding uses tubular electrodes with built-in shielding. Check your machine’s manual or ask at suppliers like Lincoln Electric for guidance on the best filler metal for your joint.
What safety gear is non-negotiable for shielded metal arc welding?
Always wear an auto-darkening helmet—Jackson Safety’s HSL-2 is popular. Heavy gloves (like Tillman 8505), fire-resistant jackets, and boots protect against sparks. Don’t forget ventilation! Fumes from molten metal aren’t something you want to breathe while working with heat and welding equipment.
Can I weld different thickness metals together?
Yes, but adjust your technique. Thinner materials need lower heat to avoid burn-through. Use a staggered bead or clamp a copper backing bar. It’s like cooking—low and slow keeps things from getting messy in the weld area.
Why does my tungsten arc welding keep causing porosity?
Contaminated tungsten or insufficient gas flow often causes those pesky holes. Grind your tungsten to a sharp point, and set argon flow between 15-20 CFH. Check hoses for leaks—it’s cheaper than redoing the whole weld!
How do I prevent warping in thin steel during gas tungsten arc welding?
Tack-weld every few inches first to hold the joint. Use intermittent welding instead of one long bead. Clamping the workpiece helps too. Think of it like stitching—small, even steps keep everything aligned while ensuring proper penetration.
What’s the easiest way to set up my welding machine for beginners?
Start with the manufacturer’s suggested settings—Miller Electric’s apps have great presets. For 1/8” mild steel, try 120 amps with a 3/32” electrode. Test on scrap metal first. Adjust heat if the bead looks too flat or piled up, ensuring a strong weld.